---
title: "Create and Edit Shapes on IPAWS Maps"
slug: "create-and-edit-shapes-on-ipaws-maps"
description: "Learn to create, edit, and delete map shapes for alerts, adhering to point limits and guidelines for effective communication across channels."
updated: 2026-02-24T16:59:22Z
published: 2026-02-24T16:59:22Z
canonical: "www.civicplus.help/create-and-edit-shapes-on-ipaws-maps"
---
> ## Documentation Index
> Fetch the complete documentation index at: https://www.civicplus.help/llms.txt
> Use this file to discover all available pages before exploring further.
# Create and Edit Shapes on IPAWS Maps
This article will show you how to create, edit, and delete map shapes for IPAWS alerts.
> [!NOTE]
> Important Note:
>
> - Shapes should only be created for alerts that will be disseminated across WEA channels.
> - FEMA has the following restrictions when creating alerting areas:
> - You can have up to **100 points in total**
> - You can create up to **10 shapes**
> - The 100-point maximum is the **total number of points from all the shapes you create**
## Create a Shape
Follow the steps in this section to create a new shape.
1. Log in to the [IPAWS website](https://cap.alertsense.com/) if you have not already
> [!WARNING]
> **Note:** You can navigate to the IPAWS website using the [website URL](https://cap.alertsense.com/), or you can [sign in to the Mass Notification system](/mass-notification/docs/sign-in-to-civicready) and click the **Public Communication** and **Send IPAWS Alert options** on the left-hand menu of the dashboard. If you do not see the Send IPAWS Alert option, you may not have permission to send alerts:
2. Begin the process of [Sending an IPAWs alert](/mass-notification/docs/send-an-ipaws-alert)
3. When you get to the **Target Area section** of the Create Public Message form, click the **Add Shape link**:
4. In the pop-up that appears, select the **type of shape** you would like to draw from the drawing tools menu on the right of the map view screen:
- **Polygon:** Create a shape with at least three straight sides
- **Square:** Create a shape with four equal sides
- **Circle:** Create a round shape with no sides
5. Draw your **shape** to cover your target alerting area:
- **To draw a polygon:**
1. Click to add new points to your shape
2. Outline your target area on the map
3. Double-click to close the polygon and create the shape
- **To draw a square or circle:**
1. Click on the map
2. Drag your mouse until the shape covers your desired area
6. Click the white rectangular **Save Shape button** at the top of the map view screen when you are done:
7. You will be redirected to the Create Public Message page
> [!WARNING]
> **Note:**
>
> Only one shape can be added at a time. If you need to add more than one shape to cover your alerting area, **repeat Steps 3 through 6** of the **Create a Shape section** as many times as necessary.
---
## Move a Shape
Follow the steps in this section to move an existing shape.
1. [Create a shape](/mass-notification/docs/create-and-edit-shapes-on-ipaws-maps#create_a_shape) if you haven't already
2. On the **Create Public Message page**, find the **Geographic Area field** within the **Target Area section** 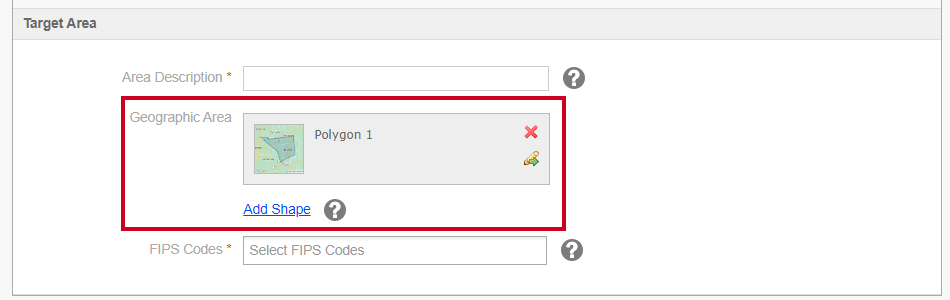
> [!WARNING]
> **Note:**
>
> Skip to **Step 4** of the **Move a Shape section** if you are already viewing the map view screen.
3. Click the **Edit Esri Shape button** (yellow pencil and green right-arrow icon) next to the shape you wish to move 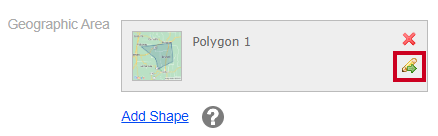
4. Click the shape on the map view screen to activate it:
5. Click and drag your shape to cover your target alerting area
6. Click the white rectangular **Save Shape button** at the top of the map view screen when you are done:
7. You will be redirected to the Create Public Message page
---
## Add Points to a Shape
Follow the steps in this section to add points to an existing shape.
1. [Create a shape](/mass-notification/docs/create-and-edit-shapes-on-ipaws-maps#create-a-shape) if you haven't already
2. On the **Create Public Message page**, find the **Geographic Area field** within the **Target Area section**:
> [!WARNING]
> **Note:**
>
> Skip to **Step 4** of the **Add Points to a Shape section** if you are already viewing the map view screen.
3. Click the **Edit Esri Shape button** (yellow pencil and green right-arrow icon) next to the shape you wish to move:
4. Double-click the shape on the map view screen to activate point editing:
5. Hover over and click one of the white dots that are now visible on the lines of the shape:
6. Move the new points to adjust the shape as needed:
7. Click the white rectangular **Save Shape button** at the top of the map view screen when you are done:
8. You will be redirected to the Create Public Message page
---
## Move Points on a Shape
Follow the steps in this section to move points on an existing shape.
1. [Create a shape](/mass-notification/docs/create-and-edit-shapes-on-ipaws-maps#create-a-shape) if you haven't already
2. On the **Create Public Message page**, find the **Geographic Area field** within the **Target Area section**:
> [!WARNING]
> **Note:**
>
> Skip to **Step 4** of the **Move Points on a Shape section** if you are already viewing the map view screen.
3. Click the **Edit Esri Shape button** (yellow pencil and green right-arrow icon) next to the shape you wish to move:
4. Double-click the shape on the map view screen to activate point editing:
5. Hover over and click one of the orange dots that are now visible on the lines of the shape:
6. Hold the shift key on your keyboard and click additional dots to select multiple points, if desired:
7. After selecting the points you want to move, drag your mouse until the points are on the desired area of the map:
8. Click the white rectangular **Save Shape button** at the top of the map view screen when you are done:
9. You will be redirected to the Create Public Message page
---
## Remove Points from a Shape
Follow the steps in this section to remove points on an existing shape.
1. [Create a shape](/mass-notification/docs/create-and-edit-shapes-on-ipaws-maps#create-a-shape) if you haven't already
2. On the **Create Public Message page**, find the **Geographic Area field** within the **Target Area section**:
> [!WARNING]
> **Note:**
>
> Skip to **Step 4** of the **Remove Points from a Shape section** if you are already viewing the map view screen.
3. Click the **Edit Esri Shape button** (yellow pencil and green right-arrow icon) next to the shape you wish to move:
4. Double-click the shape on the map view screen to activate point editing:
5. Hover over and click one or more of the orange dots that are now visible on the lines of the shape:
6. Hold the shift key on your keyboard and click additional dots to select multiple points, if desired:
7. After selecting the points you want to delete, press delete or backspace on your keyboard to remove them from the shape:
8. Click the white rectangular **Save Shape button** at the top of the map view screen when you are done 
---
## Simplify a Shape
Follow the steps in this section to simplify an existing shape using the built-in Simplify and Remove Holes actions.
1. [Create a shape](/mass-notification/docs/create-and-edit-shapes-on-ipaws-maps#create-a-shape) if you haven't already
2. On the **Create Public Message page**, find the **Geographic Area field** within the **Target Area section**:
> [!WARNING]
> **Note:**
>
> Skip to **Step 4** of the **Simplify a Shape section** if you are already viewing the map view screen.
3. Click the **Edit Esri Shape button** (yellow pencil and green right-arrow icon) next to the shape you wish to move:
4. Click the shape you would like to modify:
5. Click the **Simplify Shape button** within the drawing tools menu:
6. Select the **Simplify action** you would like to perform:
- **Simplify:** This action will help reduce the overall number of points within a shape and will also remove any holes/doughnuts within the shape
- **Remove Holes:** This action will remove any holes/doughnuts within the shape
7. Continue to modify points within the shape if needed
8. Click the white rectangular **Save Shape button** at the top of the map view screen when you are done:
9. You will be redirected to the Create Public Message page
---
## Delete a Shape
Follow the steps in this section to delete an existing shape.
1. [Create a shape](/mass-notification/docs/create-and-edit-shapes-on-ipaws-maps#create-a-shape) if you haven't already
2. On the **Create Public Message page**, find the **Geographic Area field** within the **Target Area section**:
> [!WARNING]
> **Note:**
>
> Skip to **Step 4** of the **Delete a Shape section** if you are already viewing the map view screen.
3. Click the **Edit Esri Shape button** (yellow pencil and green right-arrow icon) next to the shape you wish to move:
4. Click the shape on the map view screen to activate it:
5. Click the **Delete Feature button** (trash can icon) in the drawing tools menu:
> [!WARNING]
> **Note:**
>
> You can also press delete or backspace on your keyboard.
6. The shape is now deleted and you will be redirected to the Create Public Message page
Integrated Public Alert and Warning System.
Wireless Emergency Alerts.
Federal Emergency Management Agency.
## Related
- [Send an IPAWS Alert](/send-an-ipaws-alert.md)
- [Import IPAWS Shapes](/import-ipaws-shapes.md)