---
title: "Create and Manage IPAWS Template Groups"
slug: "create-and-manage-ipaws-template-groups"
description: "Streamline your template management with IPAWS. Learn to create, edit, and delete template groups efficiently while managing user permissions effectively."
updated: 2026-02-26T15:44:19Z
published: 2026-02-26T15:44:19Z
canonical: "www.civicplus.help/create-and-manage-ipaws-template-groups"
---
> ## Documentation Index
> Fetch the complete documentation index at: https://www.civicplus.help/llms.txt
> Use this file to discover all available pages before exploring further.
# Create and Manage IPAWS Template Groups
In IPAWS, templates are organized into groups, which streamlines the creation of new individual templates. This method alleviates the repetitive task of assigning permissions to users, making the management process more efficient. This article will show you how to create, edit, and delete **IPAWS template groups**.
> [!NOTE]
> Important Notes
>
> - A user must have the [Manage Template Groups permission](/mass-notification/docs/view-ipaws-permissions) to see the Manage Template Groups option in the Admin (administrator) menu.
> - Template groups established before the introduction of this feature will automatically be accessible to all users.
## Create a Template Group
[Embedded content](https://www.iorad.com/player/2508066/Mass-Notification--Create-an-IPAWS-Template-Group-Tutorial)
1. Log in to the [IPAWS website](https://cap.alertsense.com/) if you have not already
> [!WARNING]
> **Note:** You can navigate to the IPAWS website using the [website URL](https://cap.alertsense.com/), or you can [sign in to the Mass Notification system](/mass-notification/docs/sign-in-to-civicready) and click the **Public Communication** and **Send IPAWS Alert options** on the left-hand menu of the dashboard. If you do not see the Send IPAWS Alert option, you may not have permission to send alerts.
2. Navigate to the **Admin (Administrator) tab**, then select the **Manage Template Groups option** from the drop-down menu:
3. Click the **Create New Template Group link**: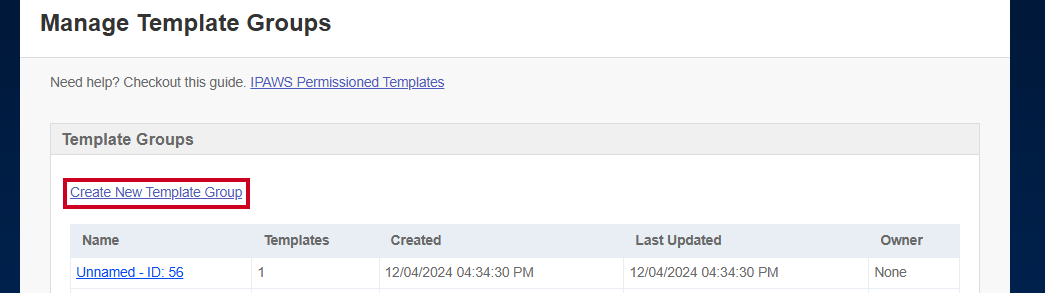
4. Fill in the **Template Group Information fields**:
- **Created On:** This field will automatically populate with the date and time you opened the Create Template Group form
- **Last Updated:** This field will automatically populate with the date and time you opened the Create Template Group form
- **Template Group Name (required):** Enter a name for the template group
- **Owner:** Select an owner for the template group from the drop-down list (automatically defaults to the user creating the template group)
5. Click the **Create Template Group button**:
6. Scroll to the **Associated Templates section** and click the **Add Templates to Group button**:
7. On the pop-up window that appears, select the **name** of a template and click the **Move button** to add the template to the new template group:
> [!WARNING]
> **Note:**
>
> You can hold down the Control (Windows computers) or Command (Mac computers) key to select multiple options at the same time.
8. Check the **checkbox** or checkboxes to the left of any associated template or templates to make quick changes in bulk, if desired: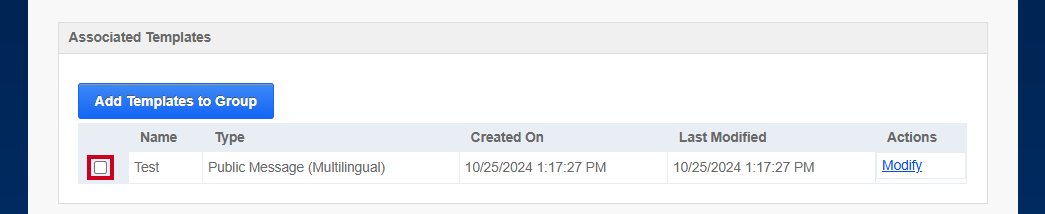
1. Click the **Move Templates button** to quickly move the selected template or templates to another template group:
> [!WARNING]
> **Note:**
>
> A pop-up message will prompt you to choose the group you wish to move the templates to. You can click the drop-down menu to select the desired destination template group, then click the Move button to execute the change: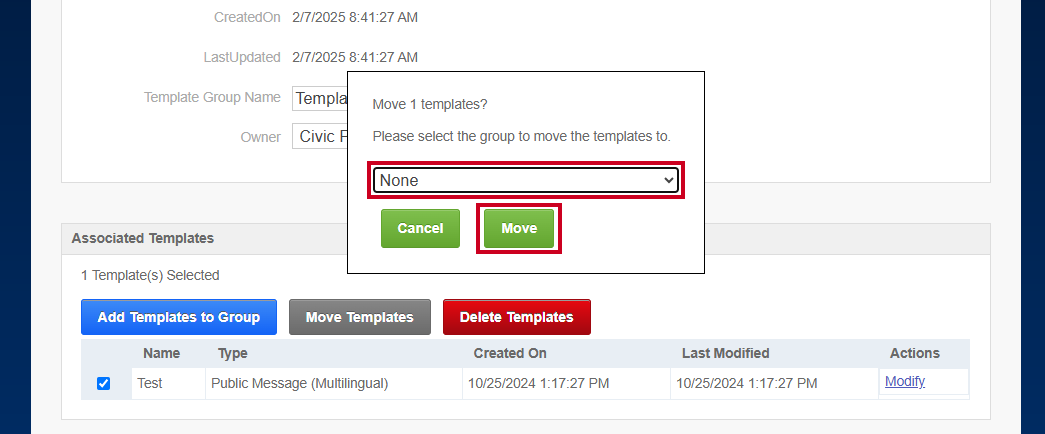
2. Click **Delete Templates** to quickly delete the selected templates from the template group:
9. Click the **Modify link** to the right of an associated template to be redirected to the Public Message Template Editor where you can make changes to the template if desired:
10. Scroll to the **Access Control section**:
11. In the **Everyone section**, check the desired **checkboxes** to enable the associated permission for every user, if desired:
> [!WARNING]
> **Note:**
>
> When a permission option is selected in the Everyone section, the corresponding permission in the Individual Users section will update to display "Enabled for All," clearly indicating the change: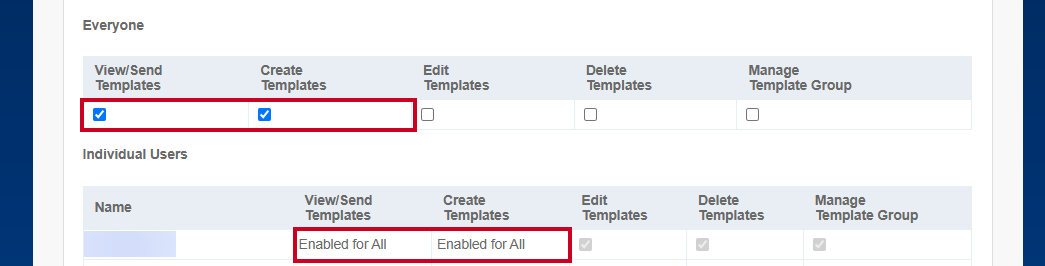
- **View/Send Templates:** All users can see and send templates inside this group when using the alert form
- **Create Templates:** All users can create new templates and add them to this group
- **Edit Templates:** All users can save changes to existing templates in this group
- **Delete Templates:** All users can delete templates from this group. This action removes the template entirely from all users’ view
- **Manage Template Group:** All Users can see management options for this group as if they had the Manage Group Templates permission
12. In the **Individual Users section**, check the desired **checkboxes** to enable permissions for specific users, if desired:
> [!WARNING]
> **Note:**
>
> For users who possess the Manage Template Groups permission, the permission checkboxes will be grayed out. This indicates that their higher-level permission takes precedence over any specific permissions assigned to individual groups on this page. This design choice helps to clarify any potential confusion regarding a user's access to particular template groups:
- **View/Send Templates:** The user can see and send templates inside this group when using the alert form
- **Create Templates:** The user can create new templates and add them to this group
- **Edit Templates:** The user can save changes to existing templates in this group
- **Delete Templates:** The user can delete templates from this group. This action removes the template entirely from all users’ view
- **Manage Template Group:** The user can see management options for this group as if they have the Manage Group Templates permission
13. Click the **Update Template Group button**:
14. The template group has been created and configured:
---
## Edit a Template Group
[Embedded content](https://www.iorad.com/player/2508070/Mass-Notification--Edit-an-IPAWS-Template-Group-Tutorial)
1. Log in to the [IPAWS website](https://cap.alertsense.com/) if you have not already
> [!WARNING]
> **Note:** You can navigate to the IPAWS website using the [website URL](https://cap.alertsense.com/), or you can [sign in to the Mass Notification system](/mass-notification/docs/sign-in-to-civicready) and click the **Public Communication** and **Send IPAWS Alert options** on the left-hand menu of the dashboard. If you do not see the Send IPAWS Alert option, you may not have permission to send alerts.
2. Navigate to the **Admin (Administrator) tab**, then select the **Manage Template Groups option** from the drop-down menu:
3. Click the **name** of the template group you wish to edit: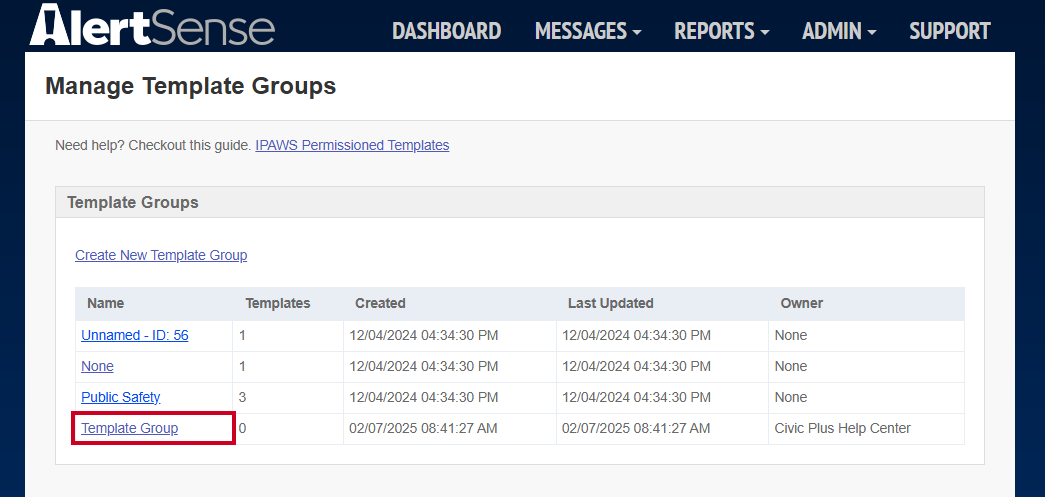
4. Update the **Template Group Information fields** as needed: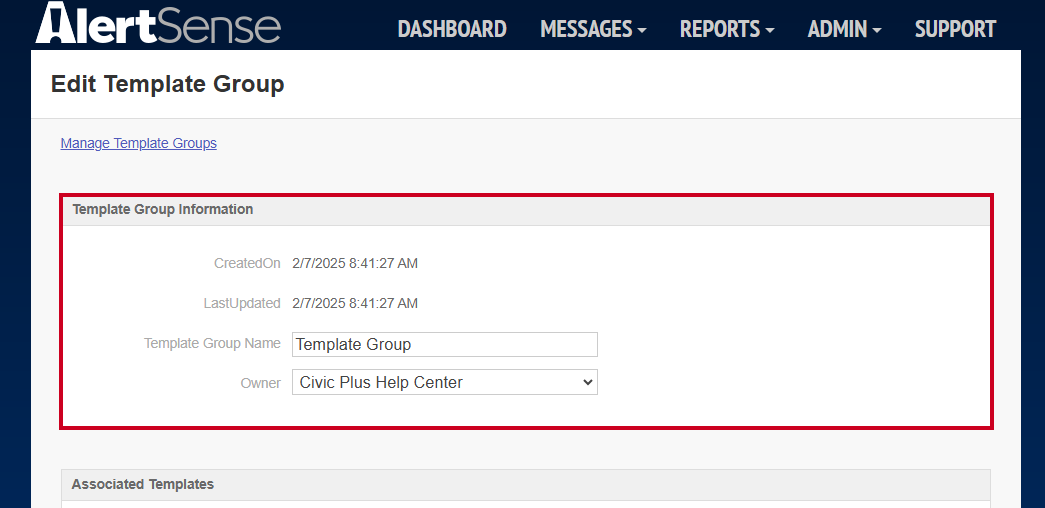
- **Created On:** This field will automatically populate with the date and time you opened the Create Template Group form
- **Last Updated:** This field will automatically populate with the date and time the Template Group was updated
- **Template Group Name (required):** The name of the template group
- **Owner:** Select an owner for the template group from the drop-down list
5. Scroll to the **Associated Templates section** and click the **Add Templates to Group button** to add additional templates to the group, if desired:
1. On the popup that appears, select the **name** of a template and click the **Move button** to add the template to the new template group:
> [!WARNING]
> **Note:**
>
> You can hold down the Control (Windows computers) or Command (Mac computers) key to select multiple options at the same time.
6. Check the **checkbox** or checkboxes to the left of any associated template or templates to make quick changes in bulk, if desired:
1. Click the **Move Templates button** to quickly move the selected template or templates to another template group:
> [!WARNING]
> **Note:**
>
> A popup will prompt you to choose the group you wish to move the templates to. You can click the drop-down menu to select the desired destination template group, then click the Move button to execute the change: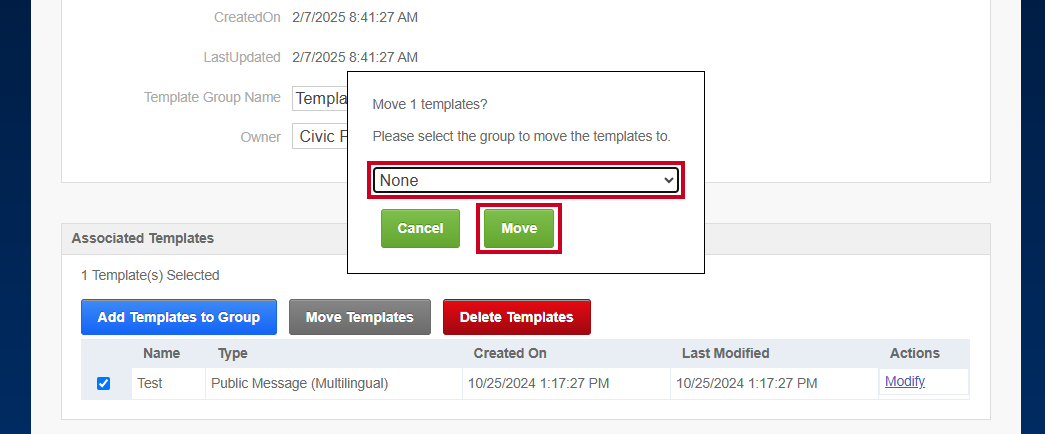
2. Click **Delete Templates** to quickly delete the selected templates from the template group:
7. Click the **Modify link** to the right of an associated template to be redirected to the Public Message Template Editor where you can make changes to the template if desired:
8. Scroll to the **Access Control section**:
9. In the **Everyone section**, check the desired **checkboxes** to enable the associated permission for every user, if desired: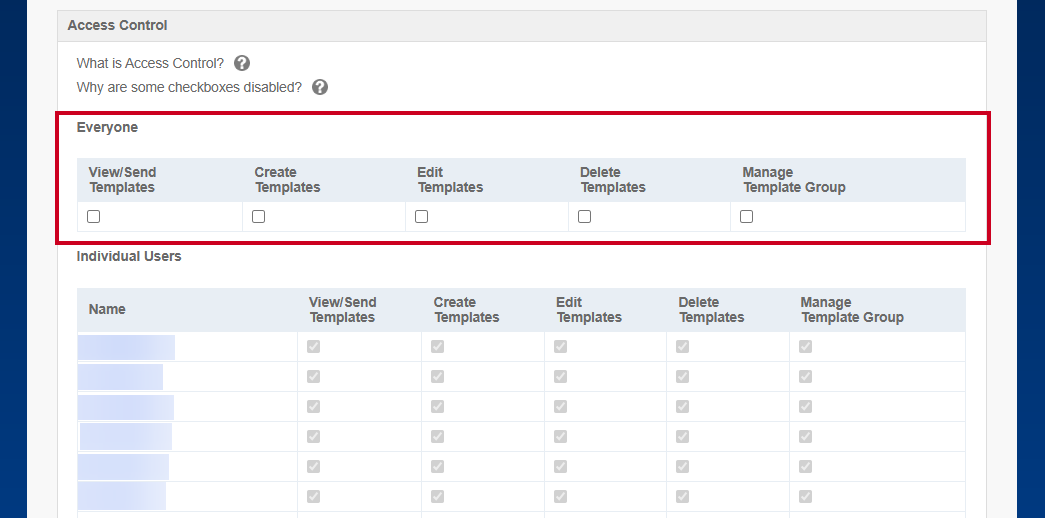
> [!WARNING]
> **Note:**
>
> When a permission option is selected in the Everyone section, the corresponding permission in the Individual Users section will update to display "Enabled for All," clearly indicating the change:
- **View/Send Templates:** All users can see and send templates inside this group when using the alert form
- **Create Templates:** All users can create new templates and add them to this group
- **Edit Templates:** All users can save changes to existing templates in this group
- **Delete Templates:** All users can delete templates from this group. This action removes the template entirely from all users’ view
- **Manage Template Group:** All Users can see management options for this group as if they had the Manage Group Templates permission
10. In the **Individual Users section**, check or uncheck the desired **checkboxes** to enable or disable permissions for specific users, if desired: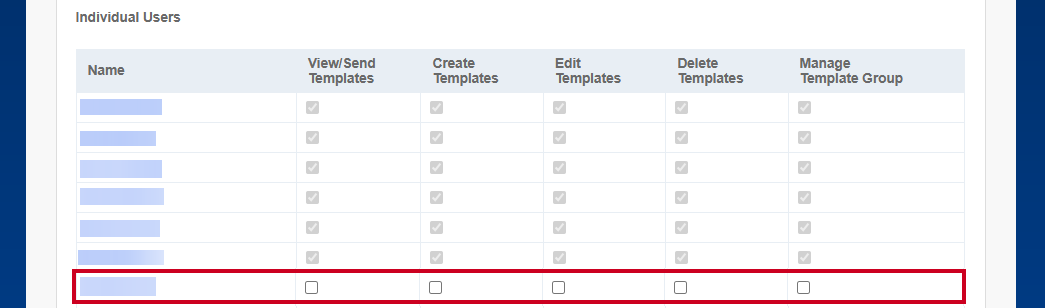
> [!WARNING]
> **Note:**
>
> For users who possess the Manage Template Groups permission, the permission checkboxes will be grayed out. This indicates that their higher-level permission takes precedence over any specific permissions assigned to individual groups on this page. This design choice helps to clarify any potential confusion regarding a user's access to particular template groups:
- **View/Send Templates:** The user can see and send templates inside this group when using the alert form
- **Create Templates:** The user can create new templates and add them to this group
- **Edit Templates:** The user can save changes to existing templates in this group
- **Delete Templates:** The user can delete templates from this group. This action removes the template entirely from all users’ view
- **Manage Template Group:** The user can see management options for this group as if they have the Manage Group Templates permission
11. Click the **Update Template Group button**:
12. The template group has been updated:
---
## Delete a Template Group
[Embedded content](https://www.iorad.com/player/2509520/Mass-Notification--Delete-an-IPAWS-Template-Group-Tutorial)
1. Log in to the [IPAWS website](https://cap.alertsense.com/) if you have not already
> [!WARNING]
> **Note:** You can navigate to the IPAWS website using the [website URL](https://cap.alertsense.com/), or you can [sign in to the Mass Notification system](/mass-notification/docs/sign-in-to-civicready) and click the **Public Communication** and **Send IPAWS Alert options** on the left-hand menu of the dashboard. If you do not see the Send IPAWS Alert option, you may not have permission to send alerts.
2. Navigate to the **Admin (Administrator) tab**, then select the **Manage Template Groups option** from the drop-down menu:
3. Click the **name** of the template group you wish to delete: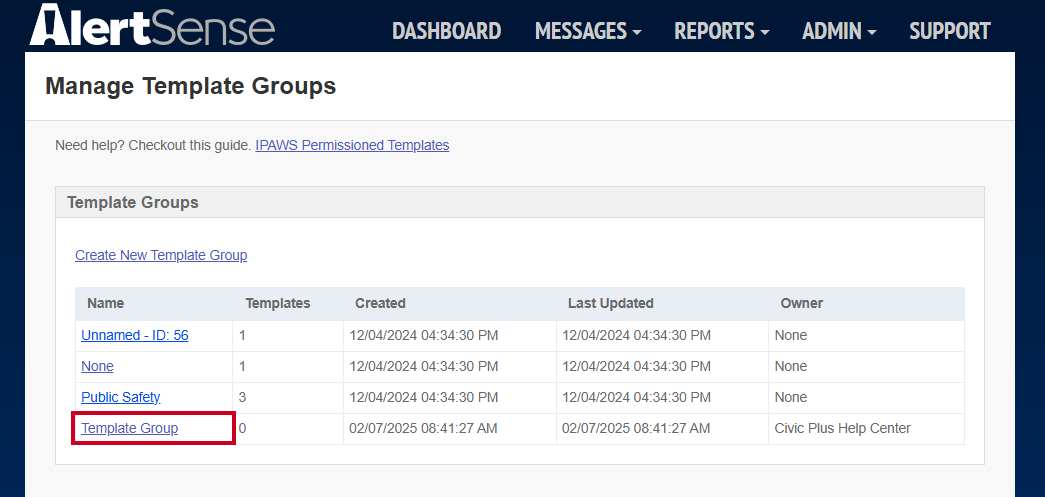
4. Scroll to the bottom of the **Edit Template Group page** and click the **Delete Template Group button**:
5. On the **Delete Template Group page** that appears, click the **Confirm Delete Template Group button** to confirm the deletion: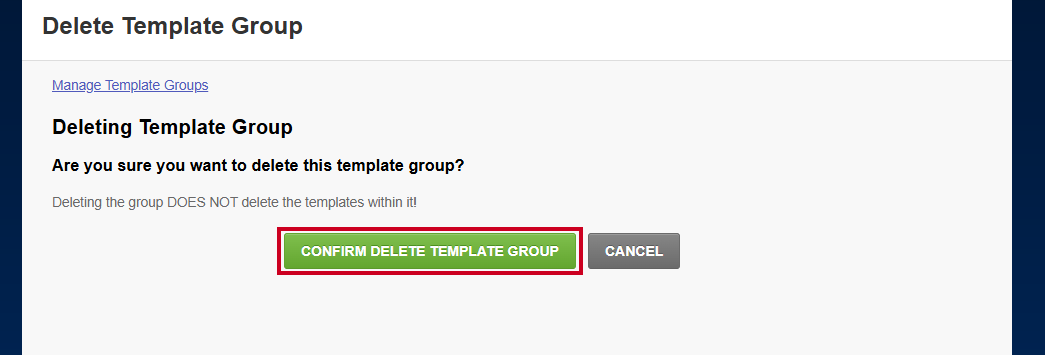
> [!WARNING]
> **Note:**
>
> Deleting the group **does not** delete the templates within it.
6. The template group has been deleted
Integrated Public Alert and Warning System.
Macintosh