You may copy an existing Form to save time for Forms that share much of the same information.
Important Note:
Copying a form essentially creates a new form record and so it will not move the submissions that are currently attached to the form, the original will stay in place and will remain untouched.
You will also have to update any links that you may have had to the form since the new form has its own URL.
Who can use this feature?
System Administrator | Owner | Publisher | Author
Disclaimer
Information submitted on this form will be sent via email. To protect sensitive information, do not request the following information on this form:
Bank Account Information
Birth Certificate Copy
Business ID Numbers
Driver’s License Numbers
Medical Information
Passport Numbers
Passwords
Routing Numbers
Social Security Numbers
Tax ID Numbers
W2 or Other Tax Information
Instructions
Navigate to Modules > Content > Form Center
.png?sv=2026-02-06&spr=https&st=2026-07-11T06%3A18%3A08Z&se=2026-07-11T06%3A30%3A08Z&sr=c&sp=r&sig=yC%2BkuT4dRwYyUSkEV6Mi%2FPcsBXECHBZaZUzXBhVI%2Bdc%3D)
Select your desired category
.png?sv=2026-02-06&spr=https&st=2026-07-11T06%3A18%3A08Z&se=2026-07-11T06%3A30%3A08Z&sr=c&sp=r&sig=yC%2BkuT4dRwYyUSkEV6Mi%2FPcsBXECHBZaZUzXBhVI%2Bdc%3D)
Select Actions on the desired form
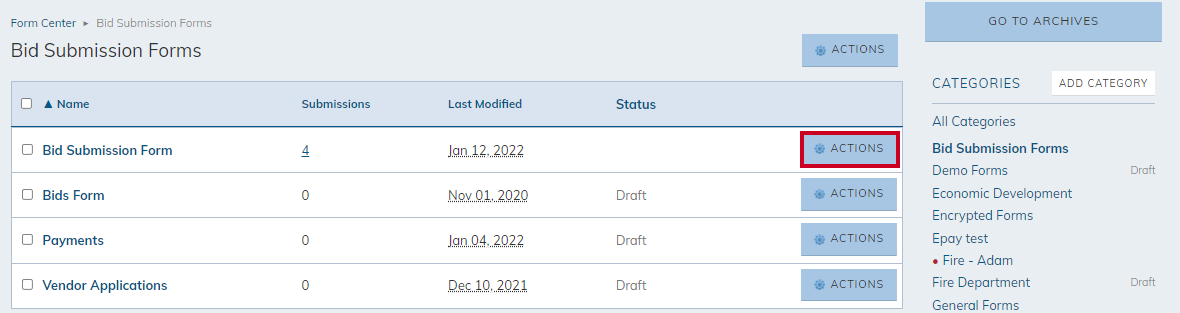
Click Copy from the dropdown menu

You will be brought to a Copy Form screen; select the desired Category from the drop-down menu
.png?sv=2026-02-06&spr=https&st=2026-07-11T06%3A18%3A08Z&se=2026-07-11T06%3A30%3A08Z&sr=c&sp=r&sig=yC%2BkuT4dRwYyUSkEV6Mi%2FPcsBXECHBZaZUzXBhVI%2Bdc%3D)
Fill out the remaining fields
.png?sv=2026-02-06&spr=https&st=2026-07-11T06%3A18%3A08Z&se=2026-07-11T06%3A30%3A08Z&sr=c&sp=r&sig=yC%2BkuT4dRwYyUSkEV6Mi%2FPcsBXECHBZaZUzXBhVI%2Bdc%3D)
Note:
All information will be copied from the previous form.
Name: Enter form name
Description: Enter a brief form description
Note:
This is optional and has a character limit of 1000 characters.
Type: Select Regular, ePayment, or External Submission
Note:
The most common for a normal form is Regular.
Submit Option: Select Submit, Print, or Submit and Print
Confirmation Page: Set the category's confirmation page or direct users to a specific page/link when they submit the page
Submit To: Type in the email address(es) this form will submit to
Additional Details:

Force Login: Set to require a user to log in before they can access the form
Enable ReCaptcha: Requires users to select a checkbox prior to the form's submission.
Note:
This option will reduce the ability of bots to submit forms.
Save to Database: Select to save the history of all submissions in the module. It is recommended to have this selected
Receive Email Copy: Select if you wish to receive a copy of the form submission via email
Display: Enter Start and End Dates for the form
The Start Date and End Date text boxes are generally left blank. If left blank, the form will be available for public use as soon as you publish it and will be available indefinitely.
If you enter a Start Date, the form will become available on that date. The form will show as Pending until the day of the date.
If you enter an End Date, the form will become inaccessible on that date.
Form Fields: View existing fields, choose to drag-and-drop additional fields or remove fields
.png?sv=2026-02-06&spr=https&st=2026-07-11T06%3A18%3A08Z&se=2026-07-11T06%3A30%3A08Z&sr=c&sp=r&sig=yC%2BkuT4dRwYyUSkEV6Mi%2FPcsBXECHBZaZUzXBhVI%2Bdc%3D)
Select Save or Save and Publish
.png?sv=2026-02-06&spr=https&st=2026-07-11T06%3A18%3A08Z&se=2026-07-11T06%3A30%3A08Z&sr=c&sp=r&sig=yC%2BkuT4dRwYyUSkEV6Mi%2FPcsBXECHBZaZUzXBhVI%2Bdc%3D)
Save: Saves the current changes without publishing them to the front-end site.
Save and Publish: Saves the current changes and publishes them to the front-end site.